Tuesday, May 13, 2014

Uncommon Grounds...Smells Delicious!!

Well, the new coffee shelf is officially complete! Here's how it was finally finished:

After gluing on the loose piece that fell off (with Gorilla Glue, of course) the shelf was ready to be painted. I chose a maroon-ish pink color since I'd used that on a previous project for the kitchen. (I haven't blogged about it, but I turned a picture frame from Goodwill into an awesome grocery list chalkboard to keep near the pantry. MEGA-helpful when trying to write my grocery list.)

I used the same color for both projects. It just made sense... (Don't judge my randomness of items!!)
 I painted the shelf once, sanded it again, and painted it a second time. I always feel like two coats is a must, in case I miss a spot, and sanding it after the first coat makes it smoother in the long run. After the second coat, I shaded part of the front with a dark maroon craft paint. Really, no one will notice but me; but I felt better knowing I put a little detail into it. :) 

Done with both coats of paint.
Once it was dry, the bf and I tried to figure the best way to hang it on the cupboard. I was all about using a saw tooth hook but he wanted more stability so opted to get some 3M Velcro hangers. He cut them in half lengthwise and secured them to the back of the shelf and TA-DA!! Ready to be hung up! 


The bf surprised me by having it hung up and ready to go when I got home the other day. I was so excited to finally put the project to good use. Luckily I discovered that we have exactly 7 different boxes of K-cups in the cupboard so this project couldn't have worked out any more perfectly. I was SO excited to fill it up with coffee and tea. 

Finished!!!! 

Thursday, April 17, 2014

Uncommon Grounds

Don't you hate when you go to make a cup of coffee, only to open the cupboard to a terrifying mountainous view of K-cups?! You attempt to pick the one out that can be  easily reached. Unfortunately, due to the Jenga-like qualities of the coffee cabinet, the flavors that have been pushed to the back have to stay there. You know they must stay there, otherwise you might accidentally brush your hand against another flavor, only to start an avalanche of individual coffee packs that end up all over the kitchen floor. 

No? This doesn't happen to you? Is this just me?!

The newly cleaned and "organized" coffee cupboard.
The first step to solving the problem was admitting that I had one...so the bf and I cleaned out and reorganized the coffee/tea cabinet. This helped a little, but only a very little. I decided the next step was to go on the hunt for something that we could use as a display for the available flavors in the house; to be hung in the kitchen, for EASY access to the coffees and teas.

At the same "barn sale" where I purchased the Hawkeye clock, I also ran across a decoration that I thought might be just the thing to solve the Jenga problem. 


It's a wooden, uh, decoration...I guess. It comprised of wooden blocks that spell out the word 'Welcome' (or 'Country' if you flip it around) all housed within a wooden framework. Each section where a block is sitting, is just enough room for me to insert one single K-cup. 

To get started, I tried to remove the blocks from the framework; unfortunately, this was beyond my skill set. I had to employ the amazing services of my bf who removed each of the wooden letter blocks (which were securely glued down). I'm not sure why one would need THAT much glue on each block but with a little elbow grease, he was able to get them all unstuck. 

No more blocks. Phew!
Next came sanding...sanding...and more sanding. I didn't really think about how difficult it would be to sand it all without taking it apart. Trying to sand inside each section proved to be super fun, but I made it with out too many troubles. One of the ends was loose and came undone, but otherwise, it was just time consuming.

Oops.
I originally wanted to stain the new shelf in a dark stain, but somewhere during its life it must have gotten wet. Unfortunately, there's a few watermarks on one of the long outer pieces so plan B is to paint it instead. 

The faulty piece was glued today and should be dry enough to paint by tomorrow. Stay tuned for more details!!

Sunday, April 13, 2014

Hawkeyes for Life...Complete

Well, this is officially a project complete! 


Both coats of primer/paint on the hands finally dried...even in the rain we've had ALLLL day long. I put the hands on the clock, inserted a battery, and (tick, tock, tick, tock) we have SUCCESS! 


All that elbow grease paid off and the clock is spic & span & ready to tell the time. It'll likely end up in the "Hawkeye" room. (For those that know us, know that we're a Iowa Hawkeye household). :) We're huge fans, fanatics really, and this will be an excellent addition to the growing collection!! 


After vs. Before

Until next time...

Hawkeyes for Life

So, the bf and I were hunting for garage sales yesterday when we came across a sale listed on Craig's List. The listing said that it was a large building filled with antiques and such. It sounded enticing so we decided to check it out. When we pulled up, we were greeted with a property out in the middle of nowhere, Iowa with tons of, uh, 'stuff' all over. And when I say 'stuff' i mean TONS of 'stuff'. Yikes! I'd call this more of a barn sale because it was literally a giant Morton building filled to the brim with things.

We searched through (i.e. tried not to trip over...) all of the goodies looking for that diamond in the rough. We came across a winner; a clock that definitely needed saving!!


It's an old Iowa wooden clock that I searched for online, but haven't been able to find any real information about it. It looks like it's probably from the 80's...but I'm not 100% sure on that. It was dirty...really dirty...


I wiped it down and washed it up hoping that the clock mechanism would work. But, when I put in a fresh battery, nothing happened. So, my first task to dismantle the entire clock. I tore off the hands and threw away the clockworks, then dismantled everything else.


I even came across a fun surprise! Behind the Iowa clock face was one for the Purdue Boilermakers! This makes me wonder if this was originally a clock kit. Otherwise, I'm not sure where the extra face came from.

Super cool! 
I sanded down all of the wood to remove the old finish, stain, and dings. I cleaned the plastic face protector and tried to clean the Hawkeye face itself, but unfortunately somewhere along the line there was water damage to the paper so it was stuck to the plastic. Pulling it off to clean it completely would have ruined it, so I left it alone. Once sanded, it all looked much better!


I did one quick coat of stain on it in 'Early American' and it looked good as new!


Since the clock mechanism was KO'ed, I went to the local hardware store to pick up a new kit. Unfortunately it was too hard to see the gold hands against the Hawkeye background so I primed the metal hands in grey and painted them black. The hands are currently drying so it should all be finished later today. :)

Once it's finished...I'll be sure to let you all see the end result!

Friday, February 8, 2013

Boy Meets Girl

"Where do you want to eat?" "I don't care..."

"Where do you want to eat?" "I picked last time..."

What do you want to eat?" "Where do YOU want to eat...?!"

"If you don't pick a restuarant, i'm going to just keep driving..."

Sound familiar? I'll admit that I got the idea from something I saw on Pintrest, but I changed it up a bit. I've been wanting to do something like this for a while, but finally got the gumption to make it happen. Welcome to my newest crafty project to make life easier and more interesting!! I haven't actually named the project yet, i just keep calling it "the sticks". So, "the sticks" are going to be painted craft sticks with names of different restaurants on them. Whenever my boyfriend and I decide to go out to eat, we simply decide on our price point and then, wahlah , we'll draw out a colored stick and eat where it says. No more arguments or indecision when we've decided to go out for the night. :) I'm so excited to get this one done!

For supplies, you'll need:
3 different colors of craft paint
a paint brush
jumbo craft sticks
a sharpie marker
brush on (or spray on) varnish


I've decided to paint the sticks in red, pink, & white. Each of the three colors represents fast food, middle ground, and higher priced restaurants, respectively. Once the sticks were painted and dry, I took a sharpie and wrote on the name of a restaurant. Then, once the sharpie was completely dry I finished it with a brush on varnish to help them last.


Once I have them all done, I hope to display them in a cool jar or other fun glass vessel. (However, I have yet to stumble upon the perfect container.) I'll be sure to make another update when I'm all done!

Tuesday, January 1, 2013

WoNkY cAkE

I took an order for a birthday cake recently, with only one direction, "fun and girly". It was Emi's 16th birthday so I decided to make her a "wonky" birthday cake made out of white and red velvet cakes. I know that Emi loves the color green and zebra stripes, so had fun making her this creation!


Transporting it was the only difficutly; since it was so tall, there wasn't a cake box big enough to fit it. Thanks to the automotive talents of my boyfriend, the cake and I made it to the destination in one piece. (PHEW!!)


Emi gave the cake two thumbs up!


Tuesday, August 21, 2012

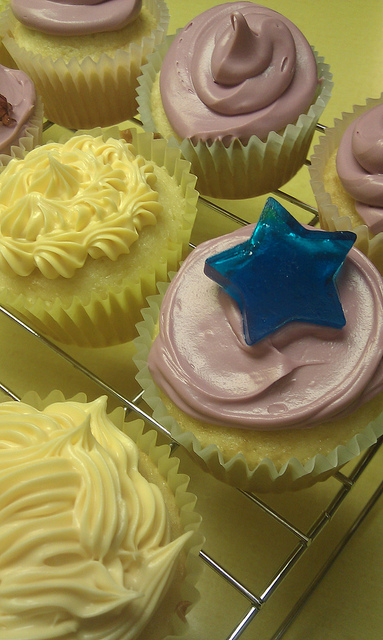
Seeing stars

Hi everyone! If you're looking for a fun new baking idea; here's something inventive and really cool to try!

Needed:
     - cookie sheet or other heat resistant surface
     - Wax paper or tin foil (I found that foil works better)
     - jolly Ranchers candy
     - small, shaped cookie cutters (Pampered Chef creative cutters work perfectly)
     - non-stick cooking spray
     - small, microwave safe bowls (glass is best)
     - microwave

Cover your baking sheet with tin foil and spray your small cookie cutter and foil covered surface with cooking spray. Unwrap 2-3 Jolly Ranchers and place in a microwave safe bowl (smaller is better).

Warm up the candies in 5-10 second intervals until they have melted and are just a bit bubbly. Keep a very close watch on the candies as they'll burn and turn brown in a matter of a few seconds...i speak from experience!! Take the bowl out of the microwave and quickly, but carefully, pour the cooling liquid into the cookie cutter (that needs to be sitting on the foil covered cookie sheet). The bowl will be very hot so be extremely aware of where you're grabbing.

Let the candies cool within the cookie cutter for a bit until just cooled, then push them out with your finger or the end of a wooden spoon. Be sure not to let the candies cool too long or they'll be very difficult to remove from the cutter. Once completely cooled, place them atop a frosted cupcake and wa-lah! Totally fun!!