Tuesday, August 21, 2012

Seeing stars

Hi everyone! If you're looking for a fun new baking idea; here's something inventive and really cool to try!

Needed:
     - cookie sheet or other heat resistant surface
     - Wax paper or tin foil (I found that foil works better)
     - jolly Ranchers candy
     - small, shaped cookie cutters (Pampered Chef creative cutters work perfectly)
     - non-stick cooking spray
     - small, microwave safe bowls (glass is best)
     - microwave

Cover your baking sheet with tin foil and spray your small cookie cutter and foil covered surface with cooking spray. Unwrap 2-3 Jolly Ranchers and place in a microwave safe bowl (smaller is better).

Warm up the candies in 5-10 second intervals until they have melted and are just a bit bubbly. Keep a very close watch on the candies as they'll burn and turn brown in a matter of a few seconds...i speak from experience!! Take the bowl out of the microwave and quickly, but carefully, pour the cooling liquid into the cookie cutter (that needs to be sitting on the foil covered cookie sheet). The bowl will be very hot so be extremely aware of where you're grabbing.

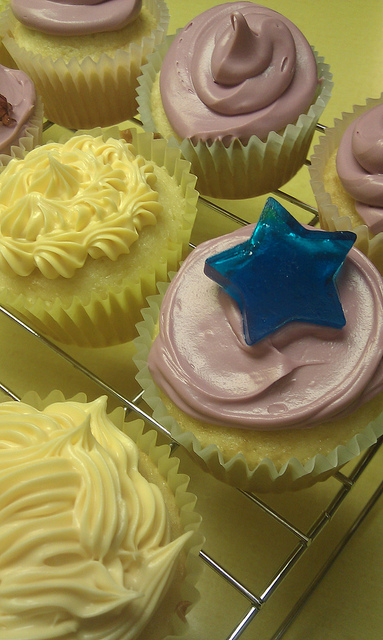
Let the candies cool within the cookie cutter for a bit until just cooled, then push them out with your finger or the end of a wooden spoon. Be sure not to let the candies cool too long or they'll be very difficult to remove from the cutter. Once completely cooled, place them atop a frosted cupcake and wa-lah! Totally fun!!

Wednesday, April 18, 2012

Deep Waters - lap 3

Man, this boat is really coming along...and quickly! While i've been playing around with all the wooden trim and Magic Erasers, the bf has laid down new carpet and fixed the motor. (He knows his stuff, no?!)

The floor board storage cover, apart and ready for sanding.
Today I spent the evening putting the last coat of finish on all of the trim, we attached some of the trim back to the boat, and I cleaned up some more of the vinyl. Seriously, this boat has made a complete transformation in the last two weeks; I can hardly believe it's the same vehicle!


The cup holders reattached to the console. I think this is going to be my favorite part of the boat! ;)
I won't be around tomorrow to help finish everything up but hopefully by Friday the boat will be completely finished. Once the bf finishes waxing and spit shining her up, she'll be ready to go. After all this work, I'm pretty sure we deserve a few adult beverages and a relaxing night on the river.

Vinyl shined up, carpet down, & some trim reattached. In the background you can see the seats have been removed & deep cleaned & the remainder of the wood has been refinished.


Saturday, April 14, 2012

Deep Waters (take two)

Things on the boat are going quite "swimmingly" since I last posted. I've taken all of the wood off and have sanded and stained almost every piece. I'm learning to remember "righty tighty, lefty loosey" because I hate it when I accidentally tighten a piece instead of removing it. Argh!

This is only about half of the pieces removed from the boat.

There are still a few parts that I haven't gotten to yet, but that's the plan for today... Since some of the wood has been sanded, stained, and coated, it has been put back on the S.S. Amber. (FYI, I named her myself. ;) I'm not sure how my bf feels about the name, but I'm sure it will grow on him. Ha!)


Refinished pieces, back on the nose of the S.S. Amber

Along with refinishing the wooden parts of the boat, I've also been occupying my time by helping clean the seats and boat covers. FYI, for those of you that have never used a Mr. Clean Magic Eraser...those things work freakin miracles! Who knew that the white vinyl seats could look brand new! They even take scuffs and smudges off the fiberglass boat! My bf didn't believe that there was anything special about the magic erasers, but now even he is a believer. :)

Up next is to finish staining and coating the remainder of the wooden trim and then cleaning the rest of the boat. Hopefully she'll be finished soon and we'll be able to take her on the maiden voyage. Stay posted for more updates very soon!

Sunday, April 8, 2012

Deep Waters

Photographer here again with a brand new project; bigger and better than ever before!


My boyfriend bought a new (to him) boat and I've decided to take on the project of spiffying it up, i.e. removing and refinishing all of the woodwork.


It isn't in horrible shape so i figure that sanding, staining, and finishing it should do the trick. So far, I've removed part of the trim, hand sanded it, stained it, and coated it with polyurethane. And, it looks great!

Pieces removed, not yet sanded.
The right piece has been sanded, the left is what it looked like before.
There is more to come in the upcoming days!! There are quite a few pieces that need to be worked but it's going well so far. Hopefully i'll have new updates soon. 

Saturday, March 3, 2012

Mmmmm...cupcakes!

In the boredom of my Saturday, I (photographer) decided to try out a new cupcake recipe. Aaaand, it was delicious! Because it contains fruit, I've decided that the recipe is super healthy, so I'm sharing pics with you plus the recipe, below...

Before the frosting...


Apple Banana Cupcakes:
2 c. flour                                        1 1/4 c. sugar
1 tsp. baking soda                       2 eggs
1 tsp. salt                                        1 tsp. vanilla
1/2 tsp. ground cinnamon         1/4 c. buttermilk
1/2 tsp. ground nutmeg            1 c. ripe bananas
2/3 c. shortening                         2 apples (peeled, cored and shredded)

Sift together flour, baking soda, salt, cinnamon and nutmeg; set aside. In a large bowl cream shortening and sugar until light and fluffy. Beat in the eggs one at a time, then stir in vanilla and buttermilk. Beat in flour mixture until just incorporated. Fold in the mashed bananas and shredded apples. Fill each of 24 muffin cups 1/2 full. Bake in a preheated 375 degree oven for 20-25 minutes; allow to cool.

..and after!


Friday, March 2, 2012

Dueling sanders - the update

Hey everyone! Just thought you might like to see a little update on one of our furniture projects... So, finally, here's the progress on "dueling sanders" a.k.a. the beautiful rocking chair that I'm refinishing.

So far I've sanded, and sanded, and sanded, and have finally resorted to stripping the rocking chair. Hopefully she'll be completely done soon, but here's a quick look at what's going on.

This is how she looked when we first found her.

It kind of looks like planet earth with all the colors she's been. We found white, black, green, blue, and more green.

If you really pay attention, she's got beauty on the inside!!


Sunday, February 19, 2012

Spiderman...Spiderman...

Photographer here again! (Pretending to be Baker...) My nephew Jaydon just met the milestone of turning 3!! Since he loves anything to do with Batman and "Piderman" I decided to make him a Spiderman cake for his big birthday bash.

I'd never made a character cake before so I wasn't sure what this was going to be like. However, pardon the pun, it really looked like it was going to be a piece of cake. Little did I know, that it would take me a few hours to frost the thing! Below I've included pictures of the cake in all of its stages. Who knew that this much work went into getting the cake to be this cute! :)

Fresh out of the pan.
I made a white cake & marbled it myself by adding powdered cocoa into half of the batter. You can't see it in this picture, but it worked out perfectly.

Stage 2: White frosting on in all the right places and black frosting outlines.
Doing the outlines was SO much harder than it looked, LOL. I guess it will be easier the next time I make one of these things. Anyone need a spiderman birthday cake?! I'm a pro these days...


Blue frosting all done!

Filling in the colors was probably the easiest part of the whole cake. It took forever, but it was not too bad once I got started. And, the frosting was deliciously fun to work with. The trick to making it tasty is butter flavored Crisco. You guys should try it, it makes it super smooth and creamy, and mighty stupendous tasting. (Don't mind the calories. I hear if you eat standing up it it's only worth half.) ;)

Ta-Da!!!


Saturday, February 18, 2012

She shoots...she SCORES!!

Photographer here again... Just wanted to write a quick post about my recent baking adventure (Baker would be so proud I did it all by myself)!! I made cupcakes for a local High School basketball team and I think they were a "slam dunk". Hardy har har...


Sunday, February 5, 2012

A cake fit for a queen!

Well folks, it's been a while, but we are still working hard on projects these days. Our most recent endeavor was a cake for a princess themed 21st birthday party. Our direction was "pink and totally girly". No problem! We came up with a simple idea for a white half sheet cake and two dozen strawberry cupcakes. They were a huge hit! (See the pics below...)


The cake for Princess Chelsey

The tie-dyed frosting was really fun!!